 Free Shipping over $5,000
 15 Years in Business
 18mo No Interest Financing
Speed is not always your friend!
Hey Everyone! Long time, no blog! Its been a crazy 2 years of post-pandemic business that’s kept us too busy to even blog for folks.
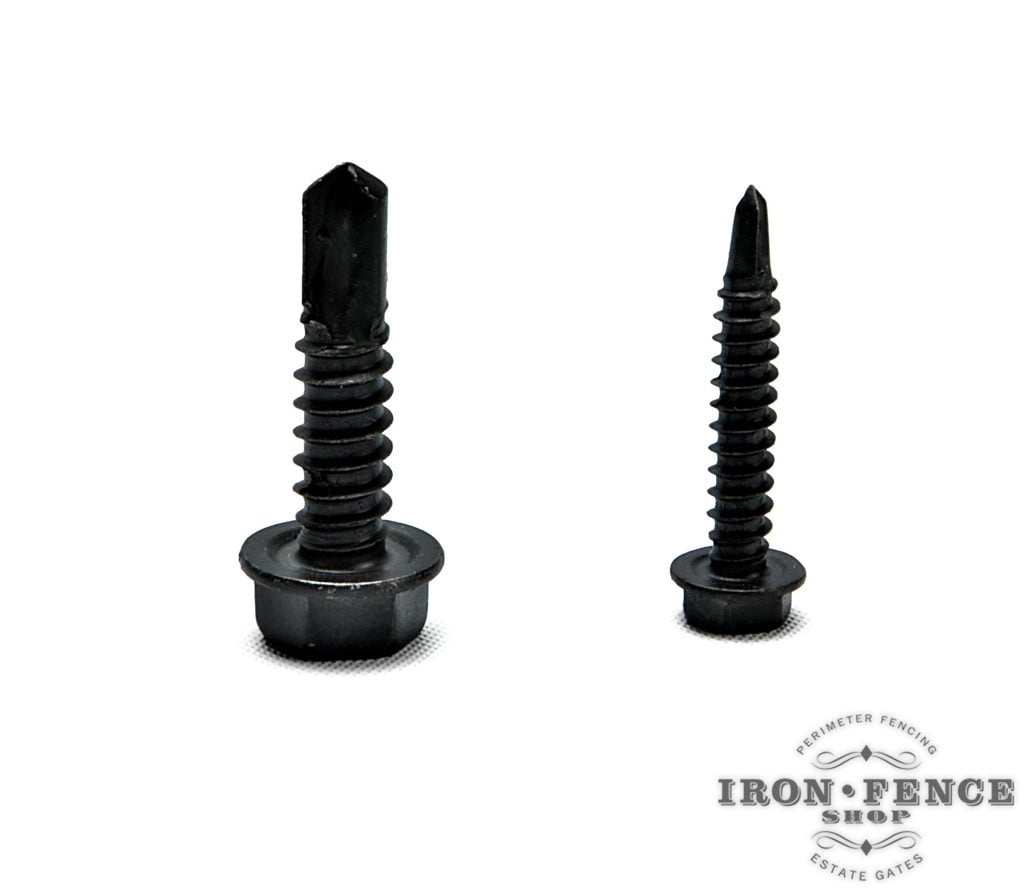
This is one I’ve wanted to put out there for awhile as its something that can aggravate folks when installing one of our Aluminum or Iron Fences or gates. I will occasionally get calls saying the self-tapping screws aren’t drilling into the post or take too much work. This is not a fault of the screws, but rather drilling technique.
Most of us have had to drill into softer materials like wood or drywall. You mark your spot, blast way at full speed and let the drill do its job. Drilling metal is very different. When drilling metal, speed is NOT your friend. Slow and steady wins the race when drilling into metal with a drill bit or self-tapping screw.
Let’s go over a few other things that help when drilling metal. I highly recommend a center punch tool, pilot holes and having some lubrication. You can use fluid specifically made for drilling metal, but something like WD-40 will also get the job done.
Always start with a center punch or smaller pilot hole with your self-tapping screws. That gives the self-tapper a place to sit in and begin cutting. Otherwise, they can ‘walk around’ before they begin cutting into the metal. ‘Walking around’ is when the screws rotates off of your original spot and moves around before cutting into the surface. This means that where the screw starts biting may not be the spot you marked. So your hole may not be in the spot you wanted it. Using a center punch tool to put a divot in the metal or drilling a small pilot hole (it needs to be a few sizes smaller than the self-tapping screw you are using) will keep your screw cutting into and landing in the exact spot you want it.
The next thing is to lubricate the end of the self-tapping screw and/ or the surface you are drilling into. Unlike softer materials like wood and drywall, metal-on-metal drilling creates a LOT of heat and wear. By adding some oil on the self-tapping screw helps keep it cooler and cut/ drill better.
So now that you have your center punch divot or pilot hole and have lubricated the self-tapping screw, the final piece of the puzzle is drill speed. You do not want to just pull the trigger and go full power even though that is what your instinct is telling you to do. Blasting your drill or power driver at full speed will only burn out the self-tapping screw and reduce its ability to drill the metal. You want to start slow and make sure its getting a bite into the metal. You can work up to 1/4 or 1/2 full power speed from there. You should see flakes of metal starting to come free of the post or gate frame at the drill point. If you don’t see any metal shavings, you may be going too fast and burning out the bit.
Hopefully that tip helps some folks. If you have any questions, feel free to email us at [email protected] or give us a call at 800-261-2729.